Wednesday, August 10, 2011

Baby Steps: T-Shirt Drawer Oganization

Hubs is a t-shirt guy…he has quite an impressive collection and wears t-shirts about every day. He does a good job at keeping the collection weeded out and getting rid of old ones when he brings new ones in. However, for a while, the t-shirt drawer remained in a state of chaos….

Every time we did laundry and put the t-shirts away, we would straighten everything back up into neat stacks.

But, the next day when Hubs pulled out a t-shirt on the bottom of the pile, the pile would topple like this and the vicious cycle of chaos continued…

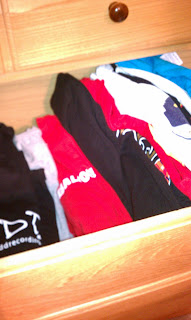
I finally had a light bulb moment to help keep the chaos under control. I started folding the t-shirts an extra fold and putting in the drawer like files…no stacks to topple!

Now, Hubs can see the whole collection, choose the perfect shirt, and pull it out without touching the other shirts, in turn, keeping the drawer neat and organized! Ahh...organized bliss... :)

Wednesday, July 20, 2011

Baby Steps: Trash on the Go

Trash…yep that’s the title. I go MIA on the blog for a few weeks and come back with trash. Maybe this heat is getting to me.
Anyway…I’ve noticed that the busier our lives get, the more trash I find accumulating in our vehicles. Maybe that’s a sign we spend too much time in the car. Last week I emptied a full cup holder of straw papers, receipts, expired coupons and other paper that has accumulated. And yes, I said cup holder. That’s where I tend to stick trash – better there than the floor I guess!
I decided that there needed to be a better system for my car. What would ride without spilling and be easy to empty? Enter the $1.00 plastic cup. It fits perfectly into the cup holder and is easy to pull out and empty. So I can continue to gather trash in it and easily dump it when full!


So a cup works for me on a daily basis but what about on longer road trips? There are times I need to coral more than just receipts and straw papers. Of course, I don’t let my car become a dumping ground but sometimes you need a larger container.
I recently repurposed an empty wipes container into a trash bag holder for the car. I cleaned it out and filled it with some small trash bags so they pull out easily. You could also fill it with grocery bags.


And, since I can’t leave well enough along, I decided that I couldn’t live with a boring white container. So to dress it up, I covered it with some leftover adhesive ribbon from another project.

Now, I have a couple of easy systems set up to keep my car trash fee! I wish every clutter problem could be solved that easily!
What clutter solutions do you use in your vehicle? Share your ideas by leaving a comment below. What works for you might work for another reader!

Tuesday, June 14, 2011

"Green" Organizing

Happy Tuesday! Sorry, I’ve been MIA from the blog lately…we’ve had a lot going on! Hopefully, I can get back to tackling my to-do list and sharing more organizational projects with you.
I’ve learned that sometimes a project sounds much better in my head than it does in actuality. I remember reading a post around Earth Day on my favorite blog about creating organizational containers out of items you already have around the house (here). I really liked this idea of organizing electrical and printer cords in separate “tubes” made from toilet paper rolls. If you’re like us, it seems like everything you buy today comes with more cords to add to our collection.
To get started, (after saving TP rolls for several weeks) I pulled out the “Electronics/Cables” box. It may all be contained in a neat little box, but it was a mess!!


I actually got the Hubs on board to go through the bundles and eliminate those cords that we no longer need. I was surprised we eliminated so many! Of course, one of my assistants had to oversee the project....


Now, I just have to find an electronic recycling program to donate this pile to!

I was left with a lot less cords than I planned, but I still went ahead with the project. Because I can’t just live with TP rolls the way they are, I used Mod Podge to disguise cover them with scrapbook paper. This was my first experience using Mod Podge and I kind of liked it…got me thinking about a lot of future projects.


After covering the TP rolls and letting them dry, I dedicated one cord to each roll. But…then I discovered that one roll was not large enough to store some of the thicker/longer cords, so I doubled up on the rolls for those.
Next, I used my handy label maker to label each cord for quick and easy locating when we need it.
I then put everything neatly back in the box. Once finished, I was a little bummed because it didn’t look as neat as envisioned. But, I was still happy overall with the project because in doing it, we were able to eliminate a lot of unnecessary clutter…so even though it didn’t make me as giddy as expected, I guess it wasn’t a total fail after all!

Monday, May 23, 2011

My First "Job"!

I’ve always said that my dream job would be a professional organizer. But, since I can’t exactly quit my day job now, I am going to enjoy doing any projects that come my way. Recently, my friend Aimee emailed asking if I would be interested in working in her sewing studio. She runs an in-home business, The Sassy Closet, which specializes in hand-made monogrammed gifts and clothing for kids. 

The Sassy Closet opened about 18 months ago and has only gained speed each and every day. All this sewing plus 2 kids has left Aimee with very little time to organize her studio so… enter me. We put our heads together and spent 1 day working in the studio to find ways to make her job more productive.

Here are some “before” photos. You can tell some serious sewing goes on in this room…


Luckily, Aimee had a walk in closet in the room that was being used for other household items. She relocated those items and dedicated the closet as her inventory room. This freed up a ton of space in the room allowing more room to work. We hung up the loose fabric pieces and stacked the fabric bolts on one closet shelf. We stored seasonal items on the top shelf, gingham items on another shelf and added a hanging organizer for small baby items (bibs, blankets, etc.) Aimee added a wire cube organizer unit on the floor to separate t-shirts by size. Market totes and beach bags were stacked neatly on the floor. We also hung a step stool on the door for easy access to the out of reach items. BTW, does anyone else get as excited as I do about an organized closet? LOVE IT!


Aimee repurposed an existing furniture piece and moved it close to the door to use as a mailing and packaging station. All boxes, bags and mailing materials are stored inside so when items are ready to ship, they are moved to this station. I love how she added fabric to the back to make the piece really “pop”.


Above the sewing stations, we added pegboard to house thread, scissors and hoops. (Thankfully Aimee knows what all of this stuff is because I am clueless and quite intimated by these machines!) The pegboard and hooks totaled $10…a great and inexpensive way to organize!


Aimee already had a large map hanging above her desk. I suggested she start adding push pins to every place that she ships an order to watch her business grow. She liked and implemented the idea and will get to see her growth every day. What great motivation!


After getting rid of a ton of scrap fabric (I’m very proud of Aimee for this!), we housed all small pieces of fabric in these 2 colorful bins under the cutting/work table.


Finally, we purchased a cubby cabinet from Target with colorful bins to house supplies such as stabilizer, zippers, buttons, etc. Aimee used some of her favorite fabrics to cover the back, adding small pops of color to the area. This was my favorite piece! We separated supplies and stored them in bins and boxes. All loose ribbon was stored in one of the small green bins with holes. Each different type of ribbon was pushed through the holes so she can just pull out the color she wants without having to dig through a ton of ribbon!


Aimee added the finishing touches like fresh paint (LOVE the color!) and a new desk lamp to really make this a welcome and inviting sewing studio. And, check out the wall art…a totally inexpensive yet creative way to decorate. Since she spends so much time in that room, why not make it a happy, colorful organized haven?


Check out The Sassy Closet for more photos and Aimee's comments on the makeover. While you're there, check out all of the adorable items offered from The Sassy Closet! Trust me, Aimee's work is wonderful...I can't wait to put my new market tote to use on my next organizing adventure.

I could not have been more satisfied with this project.But, now I’m running wild with ideas for other areas. So, if you have a space you need help with, email me …I’d love to help!

Tuesday, May 17, 2011

Commanding Cap Clutter

Does anyone else have a "cap" problem? By cap problem, I mean a husband with too many caps and no place to put them? I love the Hubs dearly, but his organization style and mine are not the same. I've battled this cap problem for several years. I've bought more cap organizers than I care to count but nothing has worked so I had to create my own solution.

Since we enter the house through the laundry room, that's usually where caps end up....mostly looking like this....


And this....


The first organizer I bought was an over the door hook like system. You had to pull each hook out and attach each cap to it. That took way too much time and effort for the Hubs so I went to the next option. Organizer #2 had clear pockets and I thought would be an easy way for him to stick each cap in its own pocket....not so much...


The pockets were so small that in order to make the cap fit, it had to be folded to fit in. And, when you get one cap in, usually the cap below fell out....FAIL!

So, after researching other organizers for way too long, I decided to come up with my own solution...but what would that be? Enter the Command Hook! One of my favorite products on the market right now (and Command did not pay me to say that!) I think I have found a use for Command hooks in every room of the house.

After sweet talking Hubs into going through his collection and weeding out the caps he doesn't really wear, I then bought enough Command hooks to hold each cap. I placed them on the back of the laundry room door and Voila...perfect cap storage!


Hubs can now see his whole collection, pick the perfect cap for the day and then EASILY put it back in its spot when he comes home! There's even an extra space to add to the collection. After that, it's "one in-one out". He's not quite as giddy as I am about cap organization, but he does oblige my OCD and keep his caps in their neat little home. :)

Monday, May 9, 2011

Baby Steps: Under the Kitchen Sink

I think the biggest misconception about organization is that it takes too much money and too much time. But, actually, there are many simple "baby" steps that you can do in mere minutes to organize your spaces. As mentioned in my first post, I have many to-do projects on my list. I think the long, cold winter affected my motivation, and there are a lot of areas that have "slipped" as far as organization goes in this house. I'm on a mission (watch out!) to reclaim all of these areas and bring them back to their simplified state. I tackled one space that has been getting on my nerves tonight...under the kitchen sink. And, I did it in 15 minutes! Here's the story:

While slaving over the oven cooking my husband a delicious dinner....


(Ok, I know what you're thinking, and I'll address this now...my strength is organizing....NOT cooking!)

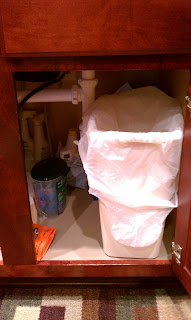
I decided to organize the area under the kitchen sink. This area is certainly not exciting and is a little hard to work around with the pipes and disposal unit. We use this area to house the trash can, a few kitchen cleaners, cat food and a fire extinguisher (insert cooking jokes about me here). Below are some before photos:


I began by taking everything out of the cabinet and wiping down the shelf liner. I weeded through the contents, removed the items that didn't belong and added a few containers to organize what was going back into the cabinet.

I put the cat treats and canned food in a basket and placed it behind their daily food container since we only access these items for their "special treats" once or twice per week.

Geez...anyone need some Temptations? I think Santa Paws went a little overboard in the cats' stockings...we have enough to last all year!


We use an airtight container with a flip lid which is a great option for housing pet food. It keeps the food fresh and is a great size for indoor use!

I put the cleaning bottles in the top bin of 2 stacking bins and added smaller cleaners and scrubbers to the bottom bin.


After 15 minutes and buying absolutely nothing to organize (I used containers I already had around the house) the cabinet looks like this:


I now have a smile on my face for completing an item on my to-do list, and the pizza is ready to eat! What a great way to start the week!

Sunday, May 1, 2011

Closet + Office = Cloffice?

Since I don't have a whole room to dedicate to a home office, I decided to turn the closet in my husband's "Man Room" into an office. Since the space is small, I have to stay on top of mail and paperwork to keep it as clutter-free and streamlined as possible. I don't have "before" pictures of the closet (I'm still getting the hang of this!) but I am happy to share the outcome!

Luckily, I was able to stock up on storage boxes on a recent trip to Ikea (the organizational Mother Ship).


I wanted wall pockets for incoming mail and bills, but the run-of-the-mill clear acrylic pockets looked a little too much like they belonged in a doctor’s office (eek!). So, to dress them up a bit, I covered them with adhesive ribbon and a present embellishment from Hallmark. I also added the black ribbon to hang them on the hooks that I had already installed in the closet.


So, there you have it…my little organized oasis right in the middle of the “Man Room”. 


And, I couldn't resist sharing a photo of my cute personal assistant. :)